Family and Group Portrait Photography Tips
For a photographer, skills in family portraits are essential and are the bread and butter for many photographers. Looking at the history of photography, one of the first popular uses the camera was not for abstract art, or photographing the family pet, but for photographing people and their families.
Because of the expense and difficulty of each photo taken, they became masters at getting things right the first time and being able to fit in as many people as possible into the frame.
In order to hone in on the small things that make a difference in this classic and often overlooked form of photography, I have come up with my eight Family Portrait tips - five DO's and three DONT's.
Family Portraits DO'S
Do squash your groups together
Even though they are family they won't be getting close enough. Maybe it's an English personal space thing, but it's always been an issue for me and having everyone in tight truly makes a difference in the tone of the picture. When families are physically close, it emits warmth and visually shows what families should be like… close.
Even if you are photographing the Adam's family, when you get everyone rubbing shoulders they look like a model family and the overall composition is more finished than a typical snapshot.

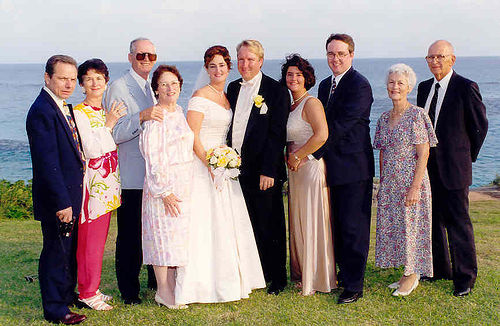
1997 Debbies Wedding Group by rkeefer on flickr (licensed CC-BY)As a starter, try having people stand at slight angles with shoulders overlapping. Also, consider the age of your family. If Grandma is present, make sure you have a chair for her. If Grandma and Grandpa are both there, you'll will need two chairs.
Do coordinate clothing
Before you meet with your family you should guide them in a wardrobe choice. Ultimately it is up to them and their families style to choose what they wear but simply reminding them to possibly overlap in a color scheme, avoid extreme colors, prints and logos on their clothing can make a big difference.
This will give you an easier time post production, and you will have both options in color and black and white. As I said, it's their picture and their choice, but a casual recommendation from the photographer is usually appreciated.
Do check the screen for blinking
Shooting and shooting is OK for one or two people, but in a larger group it can be hit and miss and you may miss that one photo where everyone has their eyes open. I used to think "Hey, its digital. I'll use the rapid fire method and surely I'll get one right." After a few sessions of transplanting eyes from one photo to another in Photoshop, I've changed my methods.
You can get away with a weak smile but if someone looks like they are sleeping in their first family portrait in 10 years, the customer may not be too happy. With experience you learn to quickly scan across everyone's eyes in an instant.
Try and be funny to get some genuine smiles
A few cheesy jokes work surprisingly well to break the tension. A typical photographer joke might be saying "Ok, I need everyone to get in focus." Or asking everyone to strike their best glamor pose.

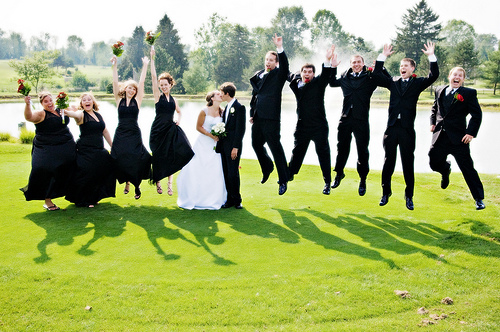
Lauren + Andrew by Corey Ann on flickr (licensed CC-BY-ND)Other ways to get a smile is to get them doing something they don't normally do. Children are much easier, have them try jumping, running, human pyramids or whatever comes to mind.
Do try and blur the background
Choose the largest aperture setting you can, while still keeping everyone sharp. An aperture of 2.8 might make the trees and shrubbery look silky smooth, but it might make Uncle Fred at the end of the line look fuzzy. This is especially a problem when everyone is standing on different focal planes.
The solution is often to shoot a few clicks smaller than the lenses widest aperture, then use the preview screen and zoom button on your camera to make sure everyone is looking good. Then adjust and continue.
If you're really serious about this, I've even heard of photographers setting out cups length-wise on a picnic table to estimate the distances you start to loose focus. Seems extreme to me, just don't forget about Uncle Fred.
OK, so that's the do's…
Family Portraits DON'TS
Don't forget to check ALL your basic camera settings before clicking away
ISO (go as low as possible), Image Size (RAW, fine), Exposure Compensation, Metering etc. It would be sad to get to the end of a great session and realize you didn't change the low quality settings from the last time you used your camera shooting the sofa you planned on selling on Ebay. Of course in-door and out-door settings will differ as will naturally lit and artificially lit.
Don't let your subjects tilt their heads into each other
This is fine for your everyday snap shot at a barbecue but not a paid photographer. Subjects tend to think they will fit into the picture better if they tilt and lower their heads.
Funny thing is, I've even caught myself doing this when I was being photographed. Watch for it and avoid it. There is always the lovey-dovey pose where they intentionally lean heads in, but that's not what I'm talking about.
Don't sound insecure
Don't say things like "This isn't working." Rephrase it into a positive, "Great, lets try a few more positions." The more you tell them the pictures are looking great the better looking the pictures will get.

Lauren + Andrew by Corey Ann on flickr (licensed CC-BY-ND)Think high fashion cliche's like, "Love it," "You're beautiful," "What a great one!" If you act like you have never seen such great photos the energy will give you just what you're looking for and they will show confidence in their smiles.


