How do I get everything in focus?
When photographing certain subjects or scenes, we want all of the image in focus. This is often the case in product photography and landscape photography. We want sharpness from front to back with no area of the product or landscape out of focus.
This can be tricky to achieve, but there are a number of techniques that can be used to achieve a very large depth of field (the amount of the image in focus).
Aperture
Probably the first thing that would come to most people's minds when trying to achieve a large depth of field is to use a small aperture. The smaller the aperture (the lens' iris), the larger the depth of field will be.
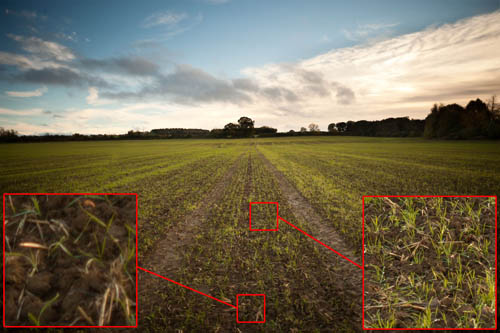
Photo taken with a large aperture. Although the center of the image (where focus was placed) is sharp, the area nearer the camera is out of focus.
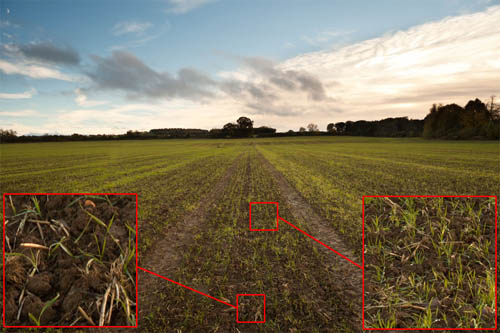
Photo taken with a small aperture. Here both the center of the image and the area near the camera are in sharp focus.
There are a couple of negative points about using a small aperture though. The first is diffraction softening – at very small apertures, although the depth of field will be large, the area that is in focus won't be quite as sharp as it is at larger apertures.
Generally you will find diffraction softening starts to become visible at apertures around f/22 or smaller. But the exact limit will depend on your camera. You can find a diffraction calculator (plus a good article on the technical side about diffraction at Lens diffraction & photography – Diffraction calculator.
The second problem is that even with the smallest aperture that your camera / lens can manage, you might still find that this does not give a large enough depth of field to get everything in focus.
And thirdly, using a smaller aperture lets less light into the camera, so you will need to use a slower shutter speed or higher ISO to compensate.
Plane of focus placement
Where you choose to focus can have an effect on how much of the image is in focus. Typically the depth of field extends for further behind where you focus than it does in front. For a landscape photograph, approximately one third of the depth of field is in front of the plane of focus, while two thirds is behind it. So focusing one third into the scene ensures the optimal use of the depth of field.
At closer focusing distances (e.g. in product photography) the difference is not so large. But unless you are photographing very small objects, then the depth of field will still be greater behind the focus plane than in front of it. So when focusing, focus a little in front of half-way through the area you want to be completely in focus.
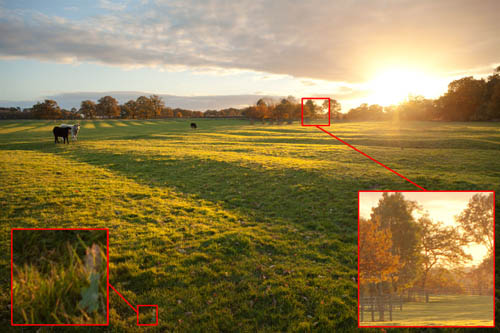
With a small aperture focusing on the horizon wastes your depth of field of field, and areas near the camera are unlikely to be in sharp focus.
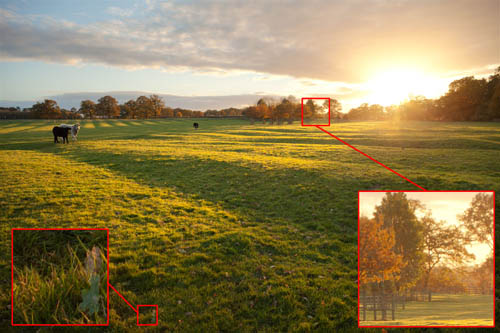
Placing the point of focus nearer to the camera makes optimal use of the available depth of field so that both the horizon and areas near the camera can be in sharp focus.
In terms of landscape photography, typically you will want to make sure that the horizon area (infinity) looks sharp while also having as much as possible in front of the horizon in focus. The distance you should focus at to achieve this is known as the hyperfocal distance. Again, the Cambridge Colour website has a nice article on this, along with a useful hyperfocal distance calculator.
Focus stacking
To create a focus stack you take multiple images of the same subject / scene. You start by taking a photo with the very front of the subject in focus. Then adjust the focus so that it is further back, but ensuring that the area of sharp focus overlaps with edge of sharp focus on the previous image. Then continue this process, shifting the focus slightly further back, until you have a set of images, each one with a different area of the subject / scene in focus.
The number of images you need to take will depend on how large the depth of field you have is, and how large the area is that you need in focus. In some cases you will only need 2 images. In extreme cases (for example very high magnification macro photography), you may need 100 images. Around 2 – 5 images is probably quite typical for most subjects though.

A set of photos, each with a different part of the subject in focus. This example is a relatively high magnification image, and so needed quite a few shots to cover the whole subject. Note that I focused by moving the camera nearer / further from the battery, not really the recommended method, but fine for this example.
Next these images need to blended into one single image that takes the in focus area from each image. This can be done manually, by adding the images as layers into photo editing software, and then using layer masks to combine them.
Alternatively, the images can be combined automatically. Photoshop CC has this ability built in, or you can use specialized stacking software such as CombineZP or Helicon Focus.

The final image from the above image stack after running through image stacking software
Tilt the focal plane
Normally the plane of focus is parallel to the camera's image sensor. However, with the right equipment it is possible to tilt the plane of focus. By tilting the lens, you can achieve an image with sharp focus from front to back.
The correct tilt direction depends on the subject and camera angle. For a landscape typically the lens would be tilted downwards so that the plane of focus is more parallel to the landscape.
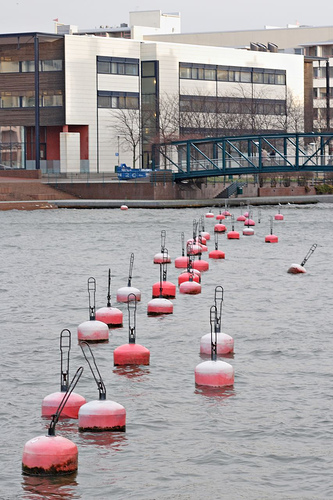
First tilt-shift trials by Miika Silfverberg on flickr (licensed CC-BY-SA)
The main issue with this technique is the need for specialist equipment. Most DSLR cameras have tilt shift lenses available for them, but they are quite expensive.
You could also use a large format camera (and lens) with a DSLR mounted on the back. Large format cameras usually allow for lens or back movements, so you can tilt the focus plane as needed. But this equipment, as well as being expensive, is also very large and heavy.
Another problem with tilting the focus plane is when you have an upright object in the foreground (such as a tree). The bottom or center may appear in focus, but the top will likely be out of focus when the lens has been tilted down.
Crop
An easy way to get more depth of field is to stand further back from your subject or use a wider angle lens. The subject will appear smaller in the frame, but more of it will be in focus. Then crop down the image to enlarge the subject to the needed size.
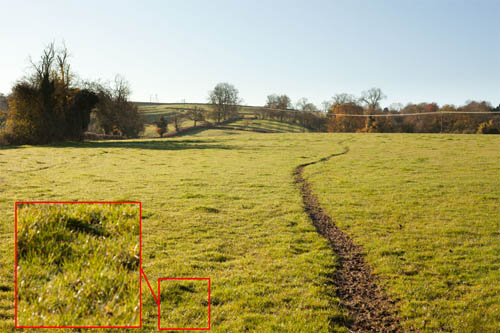
In this image you can see the area near the camera is not in sharp focus
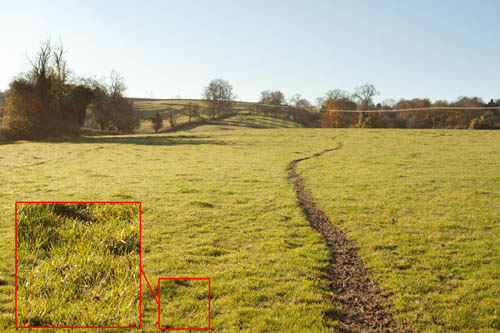
By using a wide angle focal length and then cropping the image down to give the same field of view as the previous image, we can get more of the image in sharp focus.
In the same way, you can try photographing the subject with a camera that has a small image sensor, such as most compact cameras and camera phones. These use very short focal lengths, but effectively crop the image by using a small image sensor that only covers a very small portion of the field of view.
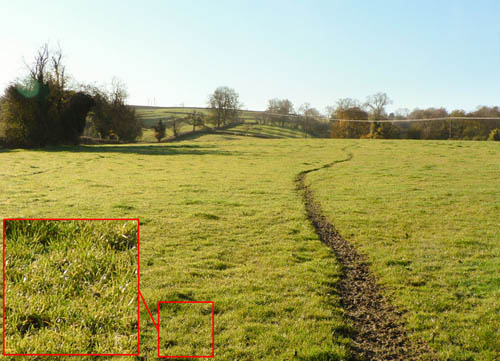
Using a camera with a small image sensor has the same effect as using a wide angle lens and manually cropping the image.
View your images at a smaller size
You might have noticed that in most of the example images for this article I've had to include close-up crops of the image so that you can see the difference a technique makes. The fact is, that when viewed at standard web sizes, an image may look completely in focus from back to front, even when areas are clearly out of focus when viewed at 100%.
This is important to bear in mind. It's not worth sweating too much in making sure your image has everything in sharp focus when viewed at 100% if it's never going to be viewed that close.
As I have covered, there are quite a few ways to enlarge the depth of field available to you. Most often you would not want to use one of these techniques in isolation, but rather combine them. For example, setting the focus distance to one third into a scene, and using a small aperture as well for a landscape photograph.
So, now you know how to get a large area of an image in focus. If, on the other hand, you want only a small area of the image in focus, you can read some tips on achieving that here: How to take photos with a blurred background by using a shallow depth of field.
